Glade Tutorial
What?
This tutorial will attempt to provide a step by step guide for Haskell developers wanting to write GTK+ apps using Glade. We assume you are using Linux, but because the GTK+ toolkit, the Glade Interface Designer and Gtk2Hs bindings are available on other platforms too, this might also help you get started there.
This tutorial page is an adaptation for Haskell and Gtk2Hs of an original tutorial for C and the GTK+ C API.
You will need:
- GTK+ libraries
- Glade version 3 (or version 2, but beware of minor differences)
- Gtk2Hs
- Basic Haskell know-how
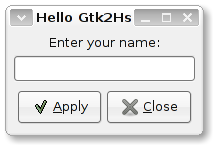
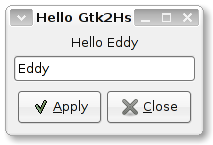
You will be creating a "Hello World"-style application like this:
Why use Glade?
Glade enables the developer to quickly and efficiently design an application visually and then move on to concentrate on actual program implementation instead of being bogged down with user interface issues.
How?
Start up Glade. It will open with a new untitled project. You should see the following (click on screenshots to see full size):
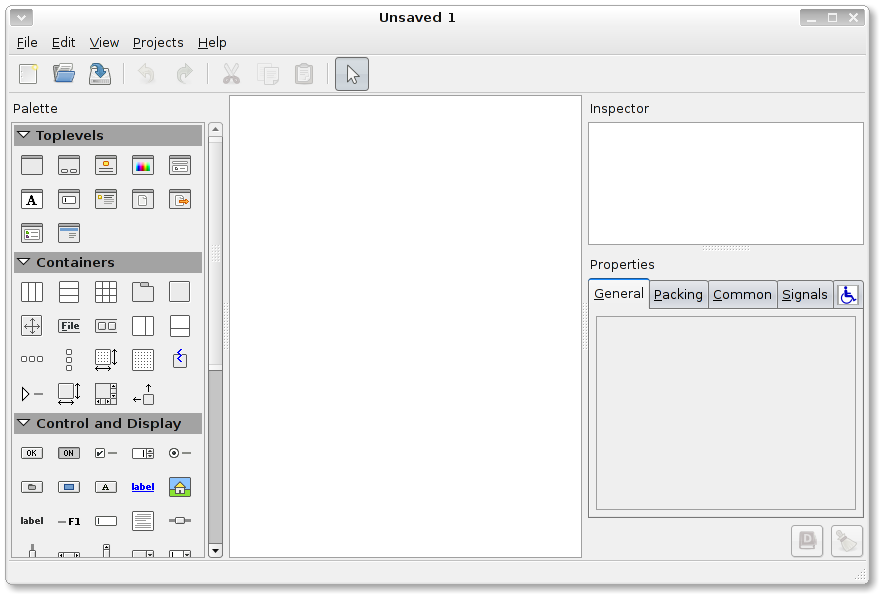
The palette on the left allows you to add widgets to your application, while the properties pane on the lower right will allow a selected widget's properties to be modified and signals (more on this later) to be defined.
The first thing we're going to need is a place to add widgets, so let's create a window by clicking on the Window icon from the palette.
 Window palette icon
A new Window widget will appear on the canvas ready to be modified. Notice the
properties (under the General tab) for the window, particularly that its
name is window1. Let's assign a descriptive title which will be displayed
in the window's title bar at run time. In the Window Title property field type
Hello Gtk2Hs.
OK, so the window is all set up, now to add some buttons and labels... but wait! We can't add widgets just yet. Widgets in GTK+ apps are packed. Packing widgets may seem to be a burden at first but is actually an ingenious method to allow many nifty things, the most immediate being automatic resizing. When a user resizes an app we usually would like the widgets in the window to be resized to take advantage of a bigger space or shrink. Packing allows this to be done automatically and greatly frees the developer from writing resizing code. Packing is done by creating boxes or tables. These widgets are invisible, meaning they can't be seen at run time, however they have a direct effect on the application.
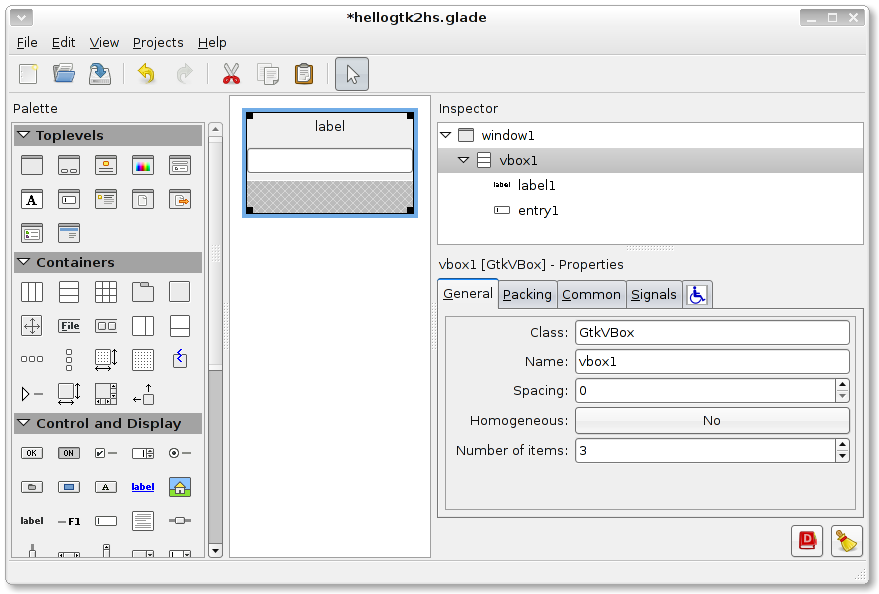
If you look back at the app we'll be creating, you can see that you can divide up the window into three rows: the label at the top, the text entry field in the middle and the two buttons at the bottom. So what we'll do is create a VBox widget with three rows. Click the Vertical Box icon in the palette and then click anywhere in the window we just created.
 VBox palette icon
Specify that you want three rows created and click OK. The window will now be divided up into three rows, ready for more widgets to be added. Add a Label widget to the first (top) row.
 Label palette icon
In the second row place an Entry widget (its tooltip refers to it as Text Entry).
 Entry palette icon
Your application window and corresponding widget tree should now look something like this:
Before we can add the buttons in the third row we must create a horizontal box within it. The new HBox widget will have two columns, one for each button, so let's do this by clicking the Horizontal Box icon from the palette and clicking in the third row of our window.
 HBox palette icon
Specify two columns and click OK. The third row will now be divided horizontally into two equal sections.
Perhaps this would be a good time to save your project. By default Glade will
save it as a .glade file in your home directory. Name your project
hellogtk2hs.
Let's move on to the buttons. Each of the sections we created in the third row of the VBox will hold a button, so let's add a Button widget by clicking the Button icon in the palette then clicking in the first (left) section. Do the same for the second section.
 Button palette icon
OK, so our buttons are in place:
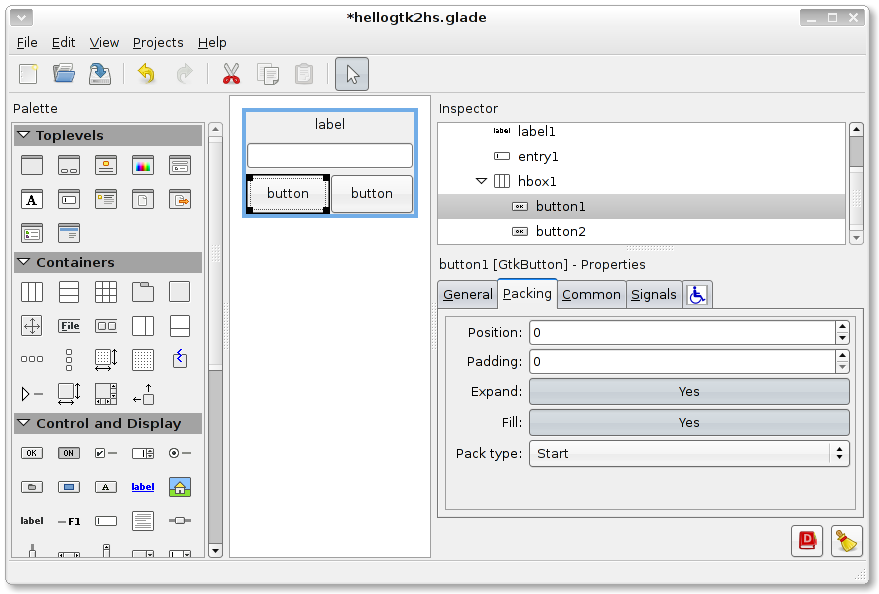
Now we'll change some packing properties to improve the look, and give our buttons identities (remember that you can select widgets easily from the Inspector pane):
- Change the Homogeneous property in the General tab for
hbox1to Yes - Change the Spacing property in the General tab for
hbox1andvbox1to 4 - Change the Border width property in the Common tab for
hbox1andvbox1to 4 - Change the Edit Type property in the General tab for
button1to Stock, then change the Stock Button property to Apply - Change the Edit Type property in the General tab for
button2to Stock, then change the Stock Button property to Close
The great thing when developing with Glade is you can immediately see what your app will look like, so play around with the properties till it looks just the way you want it.
One last property to set before we start on the coding. Change the Label
property in the General tab for label1 to Enter your name:, then
save the project.
If you now look in your home directory (or whichever directory you chose to
save the project to earlier) all you'll see is the file with the .glade
extension. This is an XML file and therefore you can inspect it with an editor
or a browser. If you do this, you'll see every widget you've specified as an
XML element, each with an id attribute. This unique name, in our case
assigned by default by Glade, is used by Gtk2Hs to access the widgets (as you
can see in Code Listing A below).
Side note: Back in the dark mists of time it was recommended practice for C programmers to generate C code from their Glade UI designs. Glade version 2 supports this directly with the Build button on the toolbar, however you should ignore that feature as it only applies to C. Indeed the recommendation these days—even for C programmers—is to load the UI at runtime, as this is much more maintainable and flexible.
Without writing one line of code we've actually created a full UI mockup. Now we will write a little code to get our application running.
First, some administration. This includes importing the necessary Gtk2Hs
modules in lines 3 and 4, initializing the graphics in line 7, exposing the
window in line 11 after all the widgets have been added, and calling the main
graphics function at the end. This is the basic template for all Gtk2Hs user
modules. To utilize our .glade file you must also add something like line
8. If the specified file is found, you now have a handle to access all your
widgets.
1  module Main where
2
3  import Graphics.UI.Gtk
4  import Graphics.UI.Gtk.Glade
5
6  main = do
7      initGUI
8      Just xml <- xmlNew "hellogtk2hs.glade"
9      window   <- xmlGetWidget xml castToWindow "window1"
10     onDestroy window mainQuit
11     widgetShowAll window
12     mainGUI
Code Listing A
Line 9 shows you how to get a handle to a specified widget using the general
xmlGetWidget function. The first argument to the function is the handle to
our Glade XML. The second argument is a cast to the desired widget type, and
the third argument is the widget's name (its id attribute) as specified in
the XML. We'll use this function again and again. Lastly, line 10 contains the
action to be taken when the user closes the window.
If you have the Glasgow Haskell Compiler installed you can use its interactive
version ghci to quickly test what we have so far for our main function.
Now all this fun is well and good, but our app is still kind of blah when it doesn't actually do anything. So let's start on the coding!
Since this is just an introductory tutorial we won't do anything too fancy. What we would like to accomplish is to let the user type his/her name in the text entry field and—when they click Apply—change the label to greet the user with a "Hello" followed by the name they entered. Also, the Close button should cause the application to terminate.
The general idea is that when something of interest happens to a widget (eg when a button is clicked), a signal is emitted, and the programmer codes what the response will be. For example:
onClicked button $ do
  ...
(Recall that $ is the right-associative function application operator and
is only used here so that we don't have to enclose the whole do block in
brackets.)
Let's start by creating two signal handlers, one for each button. First up is
the Close button since that's the easiest to implement. Let's add some
trivial code too, just to see our event in action. The putStrLn function
prints to standard out, so let's use it to signify that button2 was
clicked.
Before mainGUI, which must always be last, and widgetShowAll window,
add the following two lines:
closeButton <- xmlGetWidget xml castToButton "button2"
onClicked closeButton $ do
    putStrLn "Close Button Clicked"
As you can see, you're using the xmlGetWidget function again, but with a
different typecast than before. To actually implement the Close button like
its name implies, you might try to use mainQuit in place of putStrLn.
If you do this in ghci you'll see that pressing the button will indeed exit
to ghci, but leave the window and its descendants on the screen. When you
try to close the window you'll probably get a message from the operating system
that the application is not responding, or something similar. What you need is:
onClicked closeButton $ do
    widgetDestroy window
This will do as advertised, and because of line 10 in Code Listing A above, the program will also exit cleanly. And you now have a fully functioning Close button!
Let's re-cap what we want our Apply button to do. After a user types their name in the text entry field we will change the label to display "Hello user", where user represents the text the user entered. This will involve two basic concepts: retrieving data from a widget and setting a widget's property.
Functions specific to widgets are well documented. There is even an API search. Among other things, we can find functions specific to our immediate needs: labels and text entry fields.
The first thing we'll need is a way to obtain the text the user entered. This
is done with the get function and the entryText attribute. Secondly we
need a way to set the text in our label. This is done with the set function
and the labelText attribute. And, of course, we need to create handles for
the new widgets we want to use. Lines 14–16 in Code Listing B below won't
surprise you, and the functionality of lines 17–19 is no rocket science either.
1  module Main where
2
3  import Graphics.UI.Gtk
4  import Graphics.UI.Gtk.Glade
5
6  main = do
7      initGUI
8      Just xml    <- xmlNew "hellogtk2hs.glade"
9      window      <- xmlGetWidget xml castToWindow "window1"
10     onDestroy window mainQuit
11     closeButton <- xmlGetWidget xml castToButton "button2"
12     onClicked closeButton $ do
13         widgetDestroy window
14     label       <- xmlGetWidget xml castToLabel "label1"
15     entry       <- xmlGetWidget xml castToEntry "entry1"
16     applyButton <- xmlGetWidget xml castToButton "button1"
17     onClicked applyButton $ do
18         name <- get entry entryText
19         set label [ labelText := "Hello " ++ name ]
20     widgetShowAll window
21     mainGUI
Code Listing B
We're done! Save the program as HelloGtk2Hs.hs in the same directory as our
Glade XML file, compile it using ghc, then launch the new binary:
$ ghc --make HelloGtk2Hs.hs -o hellogtk2hs
$ ./hellogtk2hs
Type your name in the text entry field and click Apply. Hello user! Not too shabby huh...
Exercise:
Look up the Gtk2Hs API documentation to find the function for the event when the user presses Enter and use this to implement the same functionality the Apply button provides.
Exercise:
Run one of the code listings with ghci, using the main command, and
close the window, but don't leave the module. Now open your project in Glade.
Change the name of the window and hit Save to implement the change in the
.glade file. Now run ./hellogtk2hs again (or main in ghci) and
verify that the name has changed. Experiment to find out what other changes you
can make in your GUI with the same Haskell code.
What Next:
For Gtk2Hs see An Introduction to Gtk2Hs, A Haskell GUI Library by Kenneth Hoste.
The GNOME Human Interface Guidelines (HIG) contains detailed advice on how to make your GUI look good and fit well with the desktop. Much of the advice applies to all GUIs, not just the GNOME desktop.
Credits and Copyright notice
The original C version of this tutorial was written by Eddy Ahmed. It was adapted for Haskell and Gtk2Hs by Hans van Thiel, October 2006. Text and images updated for Glade 3 by Alex Tarkovsky, August 2007.
Copyright 2002 Eddy Ahmed.
Text and images have been adapted and/or used with permission of the author and retainer of the copyright.